Assemblyline frontend development
This documentation will show you how to set up your environment for Assemblyline frontend development.
Libraries
First off, Assemblyline's frontend uses the following libraries. Here are some key notes when using them while developing a feature on the frontend.
React
The Assemblyline frontend was developed using the React library. It was originally chosen for its popularity and has stood the test of time. Where Angular is a framework because some decisions were made for the developer, React is an unopinionated library allowing the developer to make their own decision for their app. The main advantage of using React is it allows developers to create modular and reusable components throughout the app.
ReactDOM: React comes with the ReactDOM library that implements the concept of Virtual DOM (VDOM). It works by storing a virtual representation of the DOM tree in memory and whenever an event causes changes of state such as a user clicking on a button or entering text in an input field, the VDOM will reconcile the differences and re-render the components and associated child components where the state change occurred .
React Developer Tools: You can install this tool as a browser extension to be able to view and track the component's state and to optimize the rendering performance of the app.
- functions over classes: In Assemblyline, we prefer to use functional components instead of class components as they seem to have been deprecated or are in legacy support.
- Hooks: Similarly, we use hooks in most use cases ever since they became popular.
- Components in a single file: Components that are only used a limited amount of time should be stored in the same file that they are used in to avoid having to search all over the place for them.
- Memoize everything: Performance optimization is a key factor when it comes to developing Assemblyline's frontend where frequent DOM changes occur. As explained before, a component will have to re-render all its content if one of its props, state or state resulting from hooks has changed. As a good rule of thumb, functional components should be wrapped with
React.memo(), methods within a component should be implemented withuseCallback()and useuseMemo()for state-derived variables to avoid unnecessary re-rendering. Note that React 19 will finally remove the need to memoize everything.
React Router
This library handles all of the "client-side routing" and provides all the hooks to track the state of the location, its parameters and the need to navigate to another location.
- Code-Splitting and Lazy loading: In order to reduce the initial bundling size, every page of Assemblyline's frontend is lazy loaded meaning that page's code and all underlying components will only be sent to the user's browser when they first navigate to it.
- Vite Chunking: When building for production, Vite is configured to create chunks, or to split the resulting JavaScript code into multiple files in order to reduce their size. In effect, this reduces the initial loading time by only sending the chunk of code needed to display the requested page.
Typescript
This library adds additional syntax for types that builds on JavaScript. Well integrated into VSCode, it provides the type inference needed to catch errors during development.
- Type everything: To make full use of this library, it is encouraged to add typing to all parameters in order to be able to catch potential issues during development.
Material UI
Most of the React components that are used in Assemblyline come from the Material UI (MUI) library. It provides all the standard UI element one might expect with minimalistic animation making easy and fast to develop on the frontend.
Material Icon: Most of Assemblyline's icons and symbols are from Material Icon as they are well integrated with its components.
- Performance over style: Note that there's a performance trade-off with using the MUI components where you get the functionalities and the styling but lose a lot of performance. In the case of rendering thousands of elements like buttons in a table, it is much faster to use regular HTML and pure CSS since the UI doesn't have to process all the component's parameters. As an example, we rarely use the
<Box />component from MUI as it doesn't offer anything more than a regular<div />doesn't and the rendering time differences is considerable at scale.
Vite
Vite.js is a build tool which aims to streamline the web development process, making it faster and more efficient for developers. The term comes from the French word for "fast" or "quick". The Assemblyline frontend previously used Create React App, but moved from it to get faster startup time, hot module replacement (HMR) and build time.
Vitest
Because the frontend now uses Vite, it uses Vitest as its testing framework. For the time being, testing components on the frontend is done selectively and mostly on pure functions. Otherwise, having both Typescript and ESLint helps to find issues that might occur during development.
ESLint
ESLint is a static code analysis tool for identifying problematic patterns or code that don't adhere to certain guidelines or standards in order to maintain code quality and consistency within a codebase. For the most part, the Assemblyline's frontend uses standard rulesets written by the React community.
- Vite integration: ESLint was not integrated with Vite runtime to preserve its fast response time during development. To view all the warnings and errors on the frontend's code, execute the
pnpm eslint .command.
Install the development environment prerequisites
Clone the UI frontend code
cd ~/git
git clone https://github.com/CybercentreCanada/assemblyline-ui-frontend.git
Install Node.js (Ubuntu)
Node.js is the JavaScript runtime that will execute the frontend's code. Using the Node Version Manager (NVM) makes it easy to install and manage your Node.js environment. Use these following commands install the Node.js version 20.
# installs nvm (Node Version Manager)
curl -o- https://raw.githubusercontent.com/nvm-sh/nvm/v0.39.7/install.sh |

# download and install Node.js (you may need to restart the terminal)
nvm install 22

# verifies the right Node.js version is in the environment
node -v # should print `v22.14.0`

# verifies the right NPM version is in the environment
npm -v # should print `10.9.2`
Otherwise, you can follow these simple commands to install Node.js
curl -sL https://deb.nodesource.com/setup_20.x | sudo -E bash -
sudo apt-get install -y nodejs
Install PNPM
PNPM (short for "performant npm") is a fast, disk space-efficient package manager for JavaScript and TypeScript projects. It serves as an alternative to package managers like npm and Yarn, with a unique approach to managing dependencies that significantly improves speed and reduces disk usage.
# install pnpm
npm install --global pnpm

# check that pnpm is installed by running:
pnpm --version
Install NPM dependencies
Still in your assemblyline-ui-frontend directory, run the following command to install all the frontend's dependencies.
# install all dependencies
pnpm install
Installing Docker and Docker Compose
Installing docker and docker compose on your machine is necessary for development.
-
Follow the install guide provided by the official Docker documentation:
-
Ensure the installation was successful by invoking the commands:
docker version
docker compose version
Configure the development environment
Setup Webpack for debugging behind a proxy
Create a file named .env.local at the root of the assemblyline-ui-frontend directory with the following content:
HOST=0.0.0.0
WDS_SOCKET_PORT=443
HTTPS=true
BROWSER=none
Setup Docker Compose environment
Setup IP routing
Create a file in the docker directory named .env.
This file should only contain the following where <YOUR_IP> is replaced by your development computer IP.
EXTERNAL_IP=<YOUR_IP>
Setup Assemblyline configuration file
From the docker directory, copy the file config.yml.template to config.yml in the same directory.
Change the <YOUR_IP> in the newly created config.ymlfile to the IP of your development machine.
Setup Assemblyline classification engine file
From the docker directory, copy the file classification.yml.template to classification.yml in the same directory.
Change the enforce value to true in the classification.yml file to turn on the classification engine.
Frontend development only
The default docker-compose configuration is setup for users who only want to work on Assemblyline's frontend. It will deploy the required docker containers of nginx, minio, redis and elasticsearch used for any development environment, but will also deploy the ui and socketio instances as docker containers and will create some test data.
Dependencies
Go to the docker directory and run the following command to launch the Assemblyline database and user interface.
docker compose up -d
Frontend
Use the pnpm run start command to launch the frontend.
# start the development instance
pnpm run start
Access the dev frontend at the following link: https://<YOUR_IP>.nip.io
Full-Stack Web Development
This development environment is for users who want to make changes to every aspect of Assemblyline. For example, you may want to create new API routes for a new frontend's page.
Docker configuration
Open the docker-compose config file located in the assemblyline-ui-frontend/docker directory. Comment out the create_test_data, al_ui and al_socketio services as we will make them run as processes instead of docker containers.
You can also uncomment the kibana service if you want a dashboard to view the raw data stored in elasticsearch.
Setup the core services
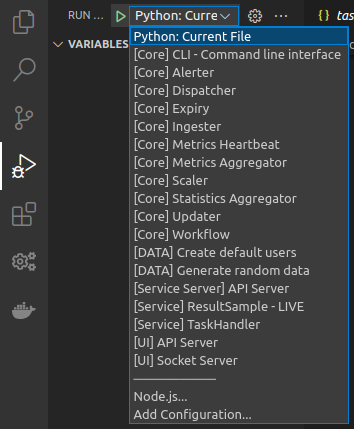
Follow the instruction highlighted on the setup script page to create the alv4 directory with all the core services. With VSCode, you only need to start a [UI] API Server process and maybe [UI] Socket Server if you are working on a component that requires a socket connection like the /dashboard. Keep in mind that any changes made to those processes will require you to reset its instances to see its effect.
Setup the Frontend
Just like before, run the following command to start the frontend's instance.
# start the development instance
pnpm run start
Access the dev frontend at the following link: https://<YOUR_IP>.nip.io